We specialize in hard to find items

 (1)
(1)


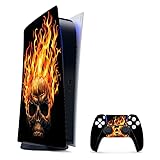
Custom PS4 Skin with Your Picture and Create Your Own Design,Customizable Playstation PS4 Controller and Console Skin, Custom Stickers for PS4 Controller
Share Tweet


Custom PS4 Skin with Your Picture and Create Your Features
-
Custom PS4 skin as your thoughts, upload your original photos or designed images, and we will turn it into your own personalized playstation skin
-
Custom PS4 High quality Sticker , adhesive backed vinyl that is precut to fit perfectly
-
This custom PS4 sticker can protect your console and controller from scratches and dust
-
Custom skin with your picture for PS4 controller and console can be easily and completely removed without leaving residue
-
Game Console and Controller System Are Not Include
-
In order to avoid the custom PS4 skin from coming blurry, we would suggest pictures with pixel more than 1000.Ideal HD pictures with pixel of 1920*1080 are appreciated.
-
If you are not satisfied with custom sticker, just feel free to contact us for free replacement or refund, no need to return it.
About Custom PS4 Skin With Your Picture And Create Your
Package Contains 1xPS4 Console Custom Skin (Sticker) 2xPS4 Controller Skin(Sticker) Actual controller not included. Installation 1)Clean the unit's surface as thoroughly as possible.Use rubbing alcohol on a lint-free cloth to remove any grease or other contaminates. Most issues of non-sticking are due to some type of oil or grease that is on the unit PRIOR to installation. 2) Peel one piece of the Skin from the paper liner. NOT to let the adhesive side touch anything. 3) Determine the placement, apply the Skin(Sticker) to the surface using your fingers or the side of your thumb, starting from one corner and working your way across the surface. 4) If a piece is not going on straight, you can gently lift it back up. Do not stretch it from its original size. 5) If installed slowly and carefully, there should be NO air bubbles left under the skin(Sticker). Any air that may become trapped under the skin(Sticker) during installation will go away in time. Optional: For the best result, apply hot air to the decal surface to activate chemical agent for better stickiness. Using a hair dryer is fine. Uninstall Simply peel off the sticker. No sticky mess or residue left.