We specialize in hard to find items

All Categories


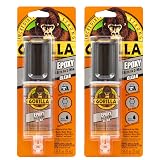
Gorilla 2 Part Epoxy, Clear Epoxy, 0.85 Ounce Syringe (Pack of 10) - 5 Minute Set, Incredibly Strong Bonding
Share Tweet


Gorilla 2 Part Epoxy, Clear Epoxy, 0.85 Ounce Features
-
Dries clear: Our Gorilla Tough epoxy resin dries clear for a clean finish and incredibly durable hold; perfect for household and automotive repairs
-
5 minute epoxy: This epoxy resin kit in just one applicator has a 5 minute set time, plenty for repositioning and adjusting
-
Gap filling: Gorilla resin epoxy also acts as a gap filler, filling voids and bonding uneven or vertical surfaces
-
Water resistant: Our clear epoxy resin withstands moderate exposure to water for extra durability
-
Easy-to-use syringe: Gorilla Epoxy has separate barrels of epoxy resin and hardener to keep the epoxy from hardening; the syringes dispense evenly and include a cap for multiple uses
About Gorilla 2 Part Epoxy, Clear Epoxy, 0.85 Ounce
Gorilla takes epoxy to the Gorilla Tough level. With its superior solvent and water resistance, Gorilla Epoxy adhesive is incredibly strong and durable for household and automotive repairs alike. The easy-to-use syringe keeps the epoxy resin and hardener separate, so it is easy to dispense. The two-part, gap-filling formula easily bonds steel, aluminum, glass, wood, ceramic, tile and most plastics. Plus, it dries in an ideal, clear finish that makes projects look spotless. Directions: 1. Prepare Your Work Area and the Surface If you’re using Gorilla Epoxy for the first time, or bonding a new type of material, we always recommend trying a test piece first. Prepare your work area: It is recommended to use Gorilla Epoxy in a well-ventilated area. Be sure your work area is protected from spills. Gather your mixing tray and stir sticks so that all your supplies are together. Prepare the surface: To improve adhesion, roughen smooth surfaces before gluing. Then clean and dry all surfaces to be bonded. 2. Mixing Gorilla Epoxy Remove the black cap from the two syringes. With tip pointing upward, cut or snap the end from tip of the syringes. With the tip still pointing upward, eliminate air and ensure even dispensing by slowly pushing the plunger until both the resin and the hardener are at the tip. Push the plunger to dispense even amounts of resin and hardener onto a clean, disposable, contained surface. The package itself can be used as a mixing tray. If you flip the plastic blister shell over, you can use the small well as a starter dish to begin dispensing until both the resin and hardener are flowing equally. Once the flow is even, move to the larger mixing well to dispense your even ratio. Mix the two parts for about 20 seconds, until the mixture is uniform. Apply within 5 minutes. As you mix, you will notice that the epoxy warms up. This is a reaction that occurs as the resin and hardener combine. 3. Application After mixing is complete, apply Gorilla Epoxy within 5 minutes. The epoxy mixture will continue to thicken and the bond strength will decrease the longer you wait to apply. 4. Clamping To reach maximum bond strength, clamp project together and leave undisturbed. Important Cure Times Set: 5 minutes to apply and position Handling: Allow to cure for 30 minutes undisturbed (no weight or handling) Final Cure: Allow 24 hours for load-bearing weight Storage: To close, pull plunger slightly back. Wipe tip clean with dry cloth and align notch on tip and cap. Close tightly.